Recipe: Royal Icing
This is an easy recipe. Only 3 ingredients.
I have to mention a few things about royal icing, though. Why royal icing? Well, royal icing contains egg whites, which makes the icing harden as it sets. The longer it sets, the harder it gets.
Why would you want your icing to do that? A couple reasons. First off, royal icing acts like an edible glue to stick things to your cake. Second, is that you can pipe decorations with stiff royal icing, let them harden, and pick them up to place them on the cake.
Thinner or flooding royal icing is soft and you can cover your cookies with it to make a perfect-looking frosting job on cookies.
Now, I have to mention that royal icing isn't known for its taste. It's not something I would go out of my way to eat. It's more for decoration than taste. So this recipe is not meant to frost a cake. It's meant to flood cookies or create decorations for a cake.
Royal Icing:
2 egg whites
1/2 tsp cream of tartar
350-450g (about 3-4 cups) of powdered sugar
A few drops of water (if necessary)
 Separate your eggs and only use the egg whites. Beat the egg whites until foamy.
 Add the cream of tartar to help stabilize the egg whites. Add the first cup or 125g of powdered sugar.
 You can use a mixer here, but it is often easier to simply use a whisk so you can control the consistency a bit easier.
 Keep adding powdered sugar until you reach the consistency you want. I first made my royal icing flooding consistency. Royal icing is often measured by how many seconds it takes for this little ribbon to melt back into the mass. Flooding consistency takes about 350g of powdered sugar and needs to be about 3-5 second consistency. So, the ribbon of icing in the bowl should take 3-5 seconds to meld into the rest of the icing. If it's too thick, add a drop at a time of water. If it's too thin, add more powdered sugar.
 Once you've reached the consistency you want, you can color your icing any color you need it to be. It takes color really well and doesn't need tons to get lovely colors.
 Then you can put your icing into piping bags.
 Snip the end of the bag off with a pair of scissors, and pipe it where you want it to be on your cookie.
 These can make quite a few lovely cookies. Flooding royal icing typically takes about 20 minutes to crust and about 3-4 hours to dry completely.
 Now, let's make some piping consistency royal icing! You start out with the same basic ingredients. Beat your egg whites until foamy and add the cream of tartar.
 Then whisk in your powdered sugar.
 Keep adding powdered sugar until the icing no longer drips off the whisk.


 This is more what we're looking for.
 Now you can add some color. Once again, it doesn't take much. If you lose the consistency a bit, you can add a bit more powdered sugar.
 Then put the icing into a piping bag fitted with whichever tip you like. I'm demonstrating a Wilton 1M large open star tip.
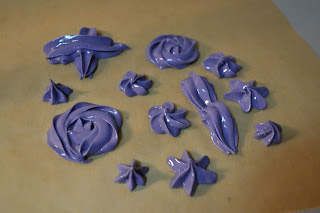
 And I just piped a variety of shapes using the star tip. Rosettes, drop flowers, etc. Just anything you want. As you can see, it holds its shape.
 Now it's wet. You can tell by how shiny the icing is.
 Once it is dry, it will be mat and not at all shiny. It will also be hard enough to pick up with your hand. Depending on the size of the piped decorations this can take anywhere between overnight and 3 days. Then you can use the decorations to decorate a cake or cupcakes or whatever you like.
 For any troubleshooting, see Haniela's YouTube video on royal icing. She's an absolute expert! https://www.youtube.com/watch?v=OE1O_7fCcCw
Watch us make royal icing on our YouTube channel here: https://youtu.be/qb2U65VADJI
Schaut zu wie wir Royal Icing auf unserem YouTube Kanal hier machen: https://youtu.be/1Znflh5ists
I have to mention a few things about royal icing, though. Why royal icing? Well, royal icing contains egg whites, which makes the icing harden as it sets. The longer it sets, the harder it gets.
Why would you want your icing to do that? A couple reasons. First off, royal icing acts like an edible glue to stick things to your cake. Second, is that you can pipe decorations with stiff royal icing, let them harden, and pick them up to place them on the cake.
Thinner or flooding royal icing is soft and you can cover your cookies with it to make a perfect-looking frosting job on cookies.
Now, I have to mention that royal icing isn't known for its taste. It's not something I would go out of my way to eat. It's more for decoration than taste. So this recipe is not meant to frost a cake. It's meant to flood cookies or create decorations for a cake.
Royal Icing:
2 egg whites
1/2 tsp cream of tartar
350-450g (about 3-4 cups) of powdered sugar
A few drops of water (if necessary)


Watch us make royal icing on our YouTube channel here: https://youtu.be/qb2U65VADJI
Schaut zu wie wir Royal Icing auf unserem YouTube Kanal hier machen: https://youtu.be/1Znflh5ists


Comments
Post a Comment