Tutorial: How to Make a Surprise Inside Cake
I've already written a blog post on this subject before when I made the Shamrock Baptism Cake. However, I felt that it needed to be redone. And I wanted to make a video out of it. So, here we go again!
Surprise inside cakes are when you cut into a cake and there's a hidden image inside the cake itself. It's super fun and it leads people to ask, "How did you do that?" Let me show you how.
You're going to need two colors of cake. I split one batch of vanilla cake and colored it, but you can also use two different flavors. It is very important that the two colors be different enough that you can see the different colors when they are next to each other.
 Whichever cake color you want to be on the inside, go ahead and bake up. Just bake it in the same size cake pan that you want your cake to be. It should also be fairly deep, so make sure you have enough batter to bake up a layer of cake at least one inch deep.
 Mine is pink, but you can make your surprise inside any color you want to.
 Then cut your colored cake into pieces. Don't make them too thick. These look quite thick, but this is a five-inch cake, so they're not nearly as thick as they look. You don't want the pieces to be thicker than your cutter, or at least not significantly.
 Now, take your same cake pan you baked your first cake in and put a tablespoon or two of your second color batter into the bottom of the pan.
 Use a very small cookie cutter to press out the shape you want. A word of advice on the shape: make sure it's not delicate and has a relatively stable base. This one has a flat bottom, which will help, but I might lose some of the points of the crown in places. Cake doesn't hold its shape as stably as other things you use this cutter on.
 Push the cutter all the way down to the table. Remove the excess cake around the cutter. The process is easier if your cake is chilled. Either in the fridge or semi-frozen. If your cake is crumbling, try chilling it.
 Now, we place the cutout into the batter in the same form it came from the cake. Point toward the middle.
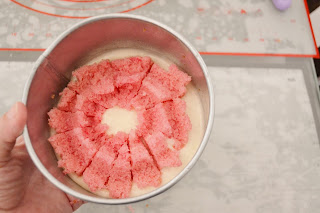
 Now keep going, keep placing the pieces in a circle in the batter base. Cut your cake pieces in half if they're too thick.
 If all goes well, your pieces should look like this.
 Now, when you place your final piece, you will expect the circle to close, but sometimes it doesn't. Sometimes there's a gap. That is because you cut the pieces out closer the center of the cake than you placed them in the cake pan.
 To fix this, just gently push all the pieces toward the center. Add a bit of batter to the outside, if they keep drifting. Gently is the word you should repeat over and over here. Gently. You don't want to break the cake apart.
 Now, gently add the batter onto the cake pieces. Use a spoon or pipe it in with a piping bag. If you pour it over the cake pieces, you will break the apart or move them apart and it will destroy your visual effect.
 But all the pieces absolutely need to be covered with batter. If you don't cover every spot, the cake will dry out in the oven. The pink cake has already been baked. If it exposed to the oven without the buffer of the batter, it will get very dry and overbaked. As long as it is covered in uncooked batter, the cake will not be dry.
 Be very careful when checking whether or not the cake is done. It's very easy to use a toothpick and accidentally poke the baked cake pieces and think this cake is finished before it is. It tends to take a bit longer than usual in the oven as well. The baked pieces of cake don't conduct heat as well as the batter does, so allow the cake to bake an extra ten minutes or so, depending on the size, and make sure you use a toothpick to check the cake where there is only batter. I checked right in the middle.
 This looks great because you can't see any of the twice-baked pieces from the outside. If you can, it's not the end of the world, but be careful not to trim the tip of the design off.
 This leveling looks amazing. Just be very careful when leveling because you don't want to cut into your design.
 The effect, though, when you cut into the cake, is lovely. This first piece shows that you can lose those delicate pieces of the surprise inside. This is missing the inside peak. It happens. So count on that as a possibility.
 But some of them will look lovely and just what you're hoping for.
 The most common question is: How did you do that?!
 Isn't that lovely? Perfect for a ballerina princess.

 Watch us make this cake on YouTube here: https://youtu.be/GDdSkD3ziEE
Schaut zu wie wir diesen Kuchen auf YouTube machen hier: https://youtu.be/5DcuQf2JQzU
Surprise inside cakes are when you cut into a cake and there's a hidden image inside the cake itself. It's super fun and it leads people to ask, "How did you do that?" Let me show you how.
You're going to need two colors of cake. I split one batch of vanilla cake and colored it, but you can also use two different flavors. It is very important that the two colors be different enough that you can see the different colors when they are next to each other.


Schaut zu wie wir diesen Kuchen auf YouTube machen hier: https://youtu.be/5DcuQf2JQzU


Comments
Post a Comment