Cake Portrait of My Daughter
This is my daughter, Sabrina. She's special in several ways and for so many reasons. But today I just want to talk about one aspect of her. She's dyslexic. She's struggling with learning to read.
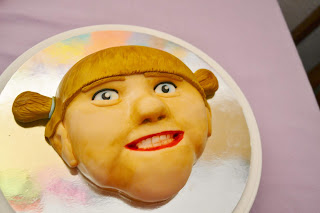
Because she's in first grade, learning to read is a big part of her academic life right now. She got very discouraged the other day and felt like she was never going to learn how to read. I decided she needed a bit of encouragement. I wanted her to feel that I love her just the way she is. Not because she's a great reader. So, I decided to make a different kind of cake than I've ever made before. I made a cake portrait of my sweet, six-year-old Sabrina.
I had some banana cake in the freezer just waiting to be used.
I began by carving the general shape of a face. Years and years ago I used to draw portraits, so I know the proportions of a face. Eye sockets are right in the middle of the face. Eyes are one eye width apart. Noses are about one and a half eye-widths long. The width of the nose is the same as the width of the eyes at its widest point.
I also carved the general shape of the face with jowls and a strong chin.
Then I deepened the eye sockets and gentled the edges of the face.
Then I carved out the mouth and carved in smile lines from the nose to the chin. In retrospect, these could have been deeper.
And I rounded the edges and gentled the slopes a bit again.
Then I frosted the cake with vegan American buttercream.
I noticed one point, though. The tip of the nose seemed to be quite flat. So, I filled it in with a piece of fondant.
I mixed up some flesh-colored fondant with white, a pinch of red, and some brown food coloring. The color was perfect.
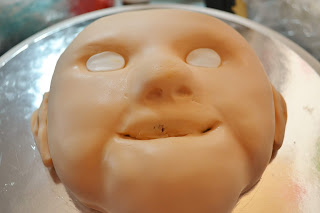
I rolled it out and carefully smoothed it onto the cake. I pressed the fondant into the holes and smoothed it really well with my fingertips.
I trimmed off the excess fondant.
I used a ball tool to press the eye sockets in deeper as well as to form the nostrils.
Then I used a knife to cut open the mouth. I just decided it needed to be deeper than it could be with the fondant intact.
Then I formed some general ear shapes. These should be from halfway between the eyes and eyebrows to halfway between the mouth and nose. Make sure you don't make them the wrong size.
But when I laid them on the cake, they were too deep and ended up looking like her ears stick out really bad.
So I trimmed them down to only be about half the size.
Then I pressed some balls of white fondant into the eyes.
The teeth are tiny balls of white pressed next to each other and then squashed flat into the mouth.
Then I made the eyes. The irises are light blue and the pupils are black.
Then I placed them on the eyes.
I rolled a snake of black fondant to be the eyelashes.
But my daughter has a sweet little fold under her eyes. I rolled out a snake of flesh-colored fondant and pressed them down to be flatter and put them under her eyes.
Then I mixed up some medium to dark blond color. I made it out of yellow fondant and mixed it with some brown.
I rolled it out rather thick and laid it over the top of her head. I used a knife to make some hair texture along the edge.
Then I added more texture to the hair. I also added some teardrop shapes of blond fondant and placed them on either side of her head. And laid a snake of pale blue on top to be the hair ties.
Then I painted on some brown food coloring mixed with alcohol to make an edible paint to give her hair depth and shading on her face.
And I painted her lips red mixed with a touch of brown and used red and brown to separate the teeth. I tried to dab off some of the color so it wouldn't be too dark, but I thought the off-white was more true-to-life.
I love how this cake turned out. My daughter was very touched and completely blown away.
I think there's a resemblance. Not perfection, but not bad. I left off her glasses because that would require some wire structure, which I wasn't up to making.
This was her reaction. So happy and pleased.
Not a bad resemblance.
But this was the face she made when I suggested cutting into it. Okay. It's your cake.
Watch us make this cake on YouTube here: https://youtu.be/Hc1aCzX9Y_4
Schaut zu wie wir diese Torte auf YouTube machen hier: https://youtu.be/Lo0Gywtrrck


Comments
Post a Comment