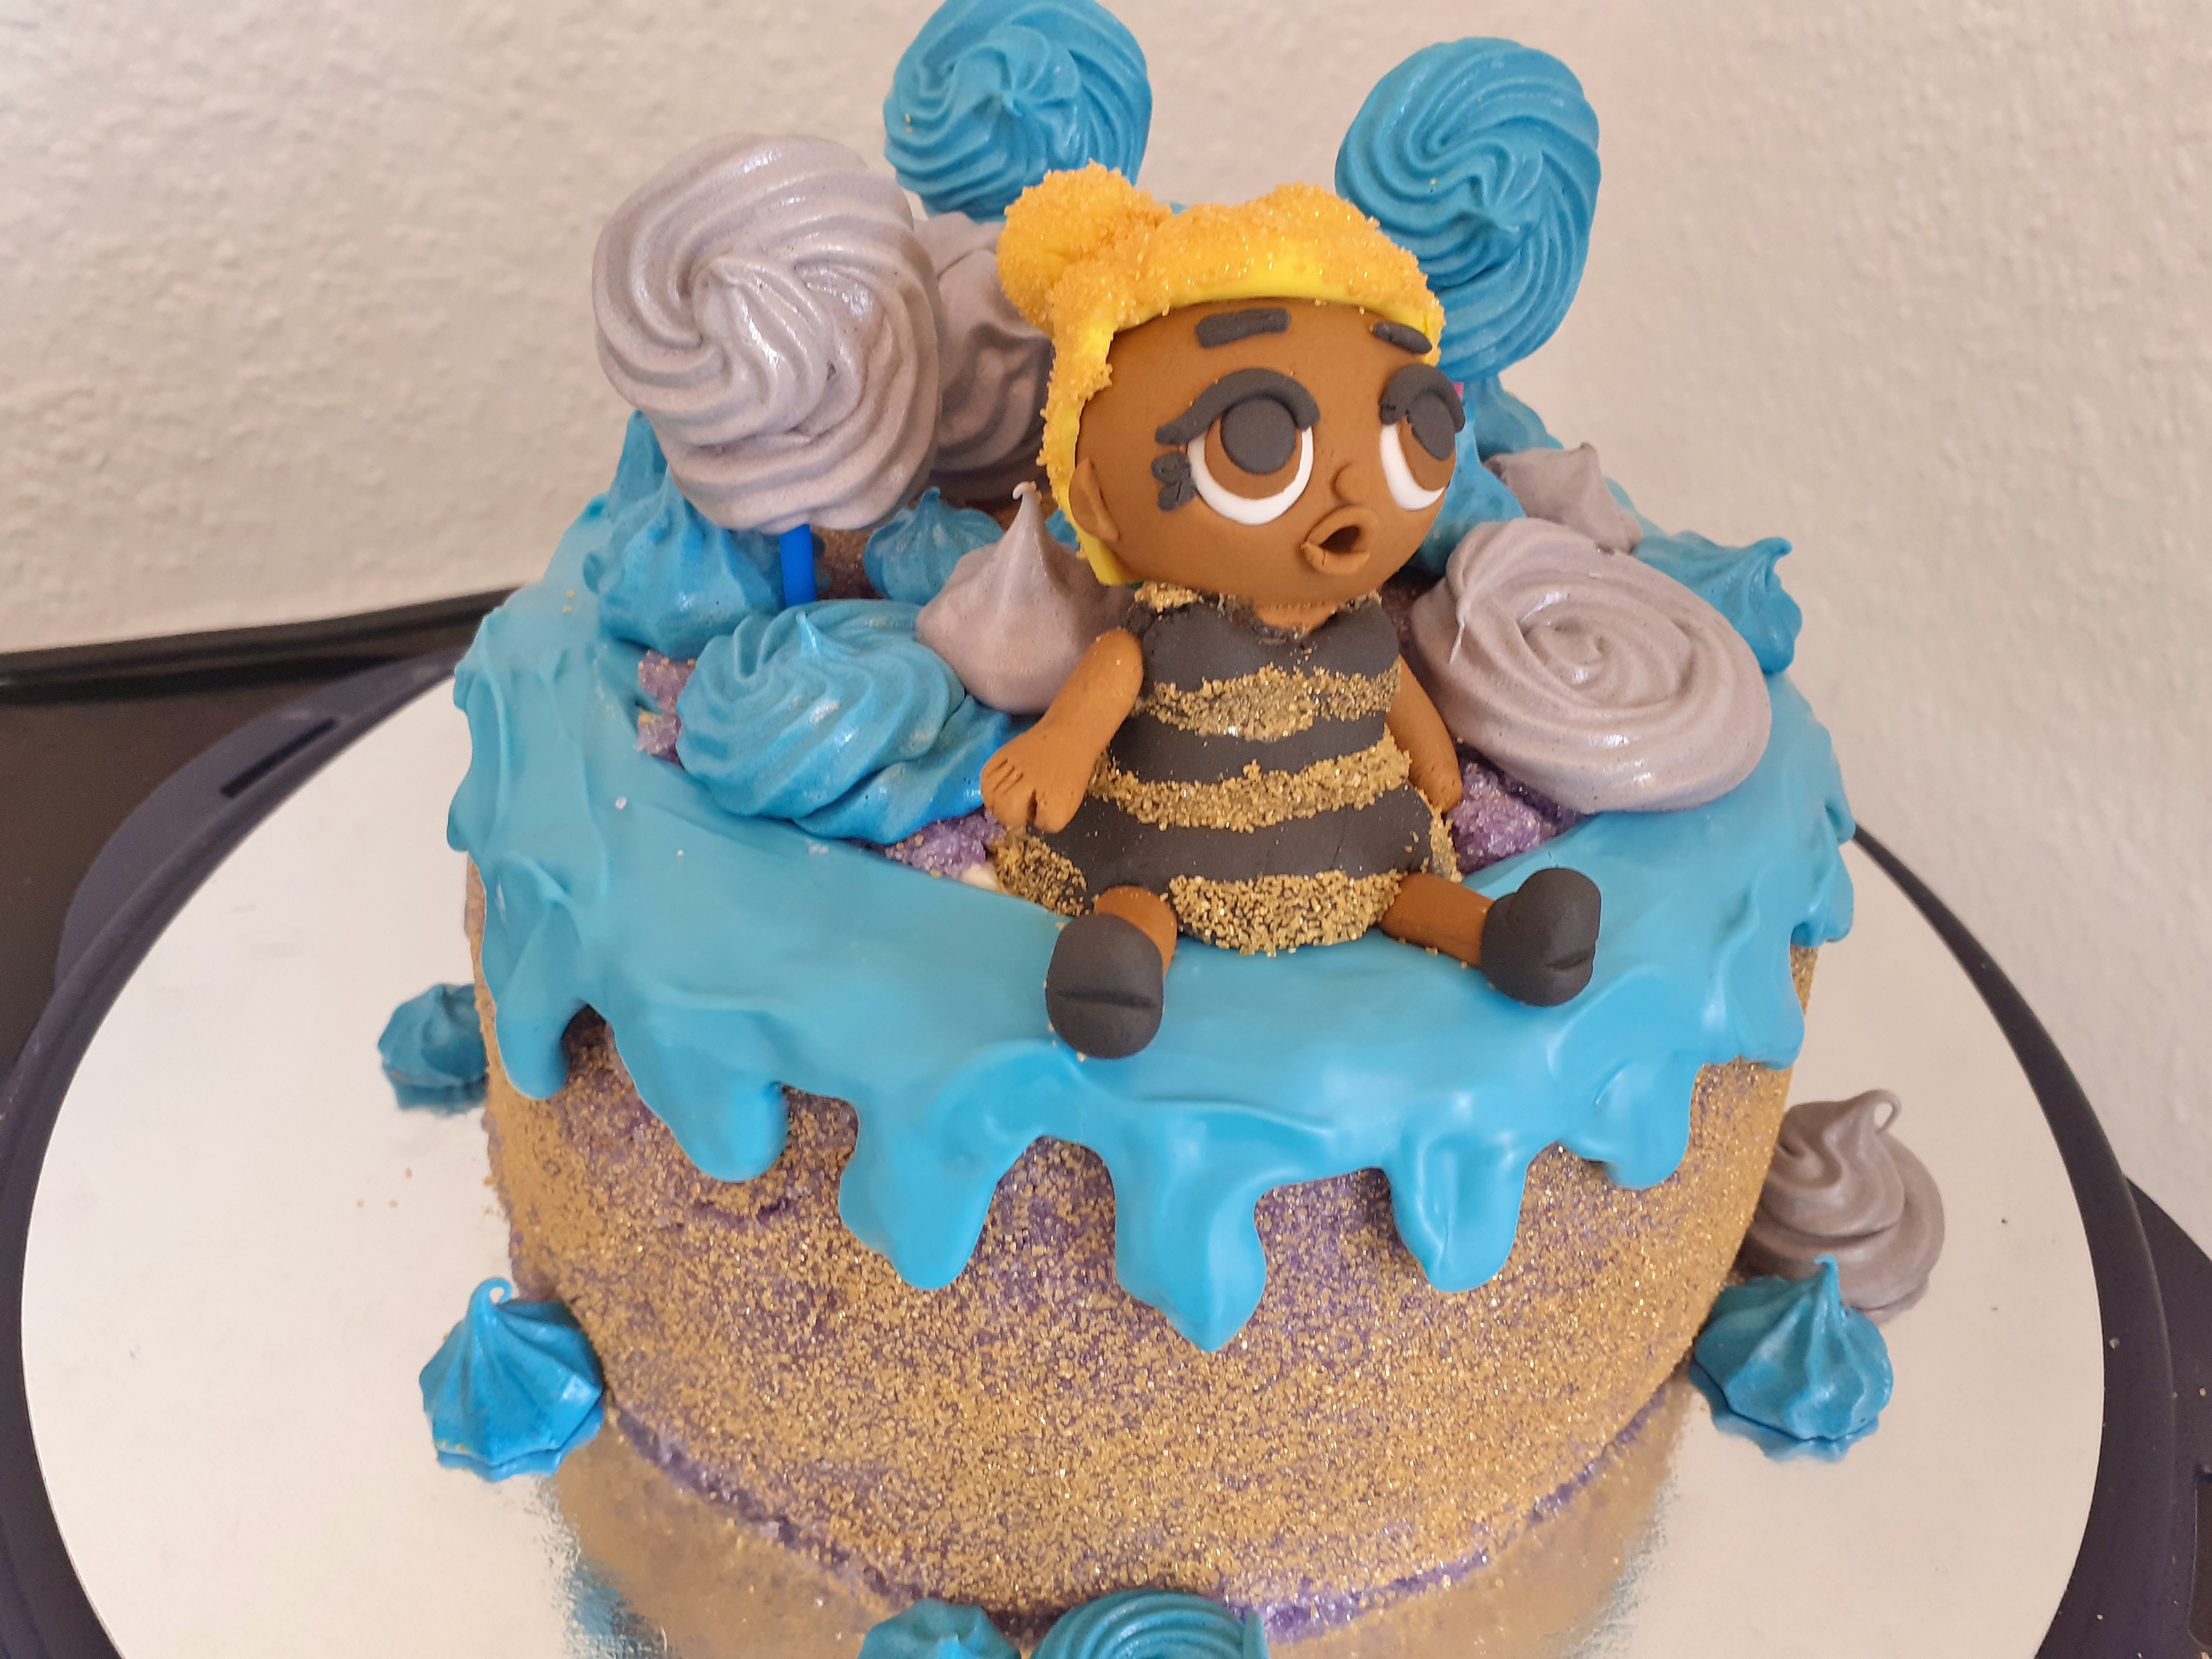
LOL Surprise Sugar Sheet Drip Cake with Meringue Cookies
This cake is for my daughter's seventh birthday. I really wanted it to be something special because we were unable to have a party for her due to COVID-19. She had a few very specific ideas on what she wanted. She wanted an LOL Surprise! Themed cake. She also wanted it to be surrounded in a purple sugar sheet with some gold on it and with a blue white chocolate drip.
She initially wanted me to model three LOL Surprise! figures, but we unfortunately ran out of time. In the end, she had to be satisfied with one. So, I did my best to model Queen Bee.
I started out with some light brown fondant that I added more brown food coloring to as well as a touch of black to darken it.

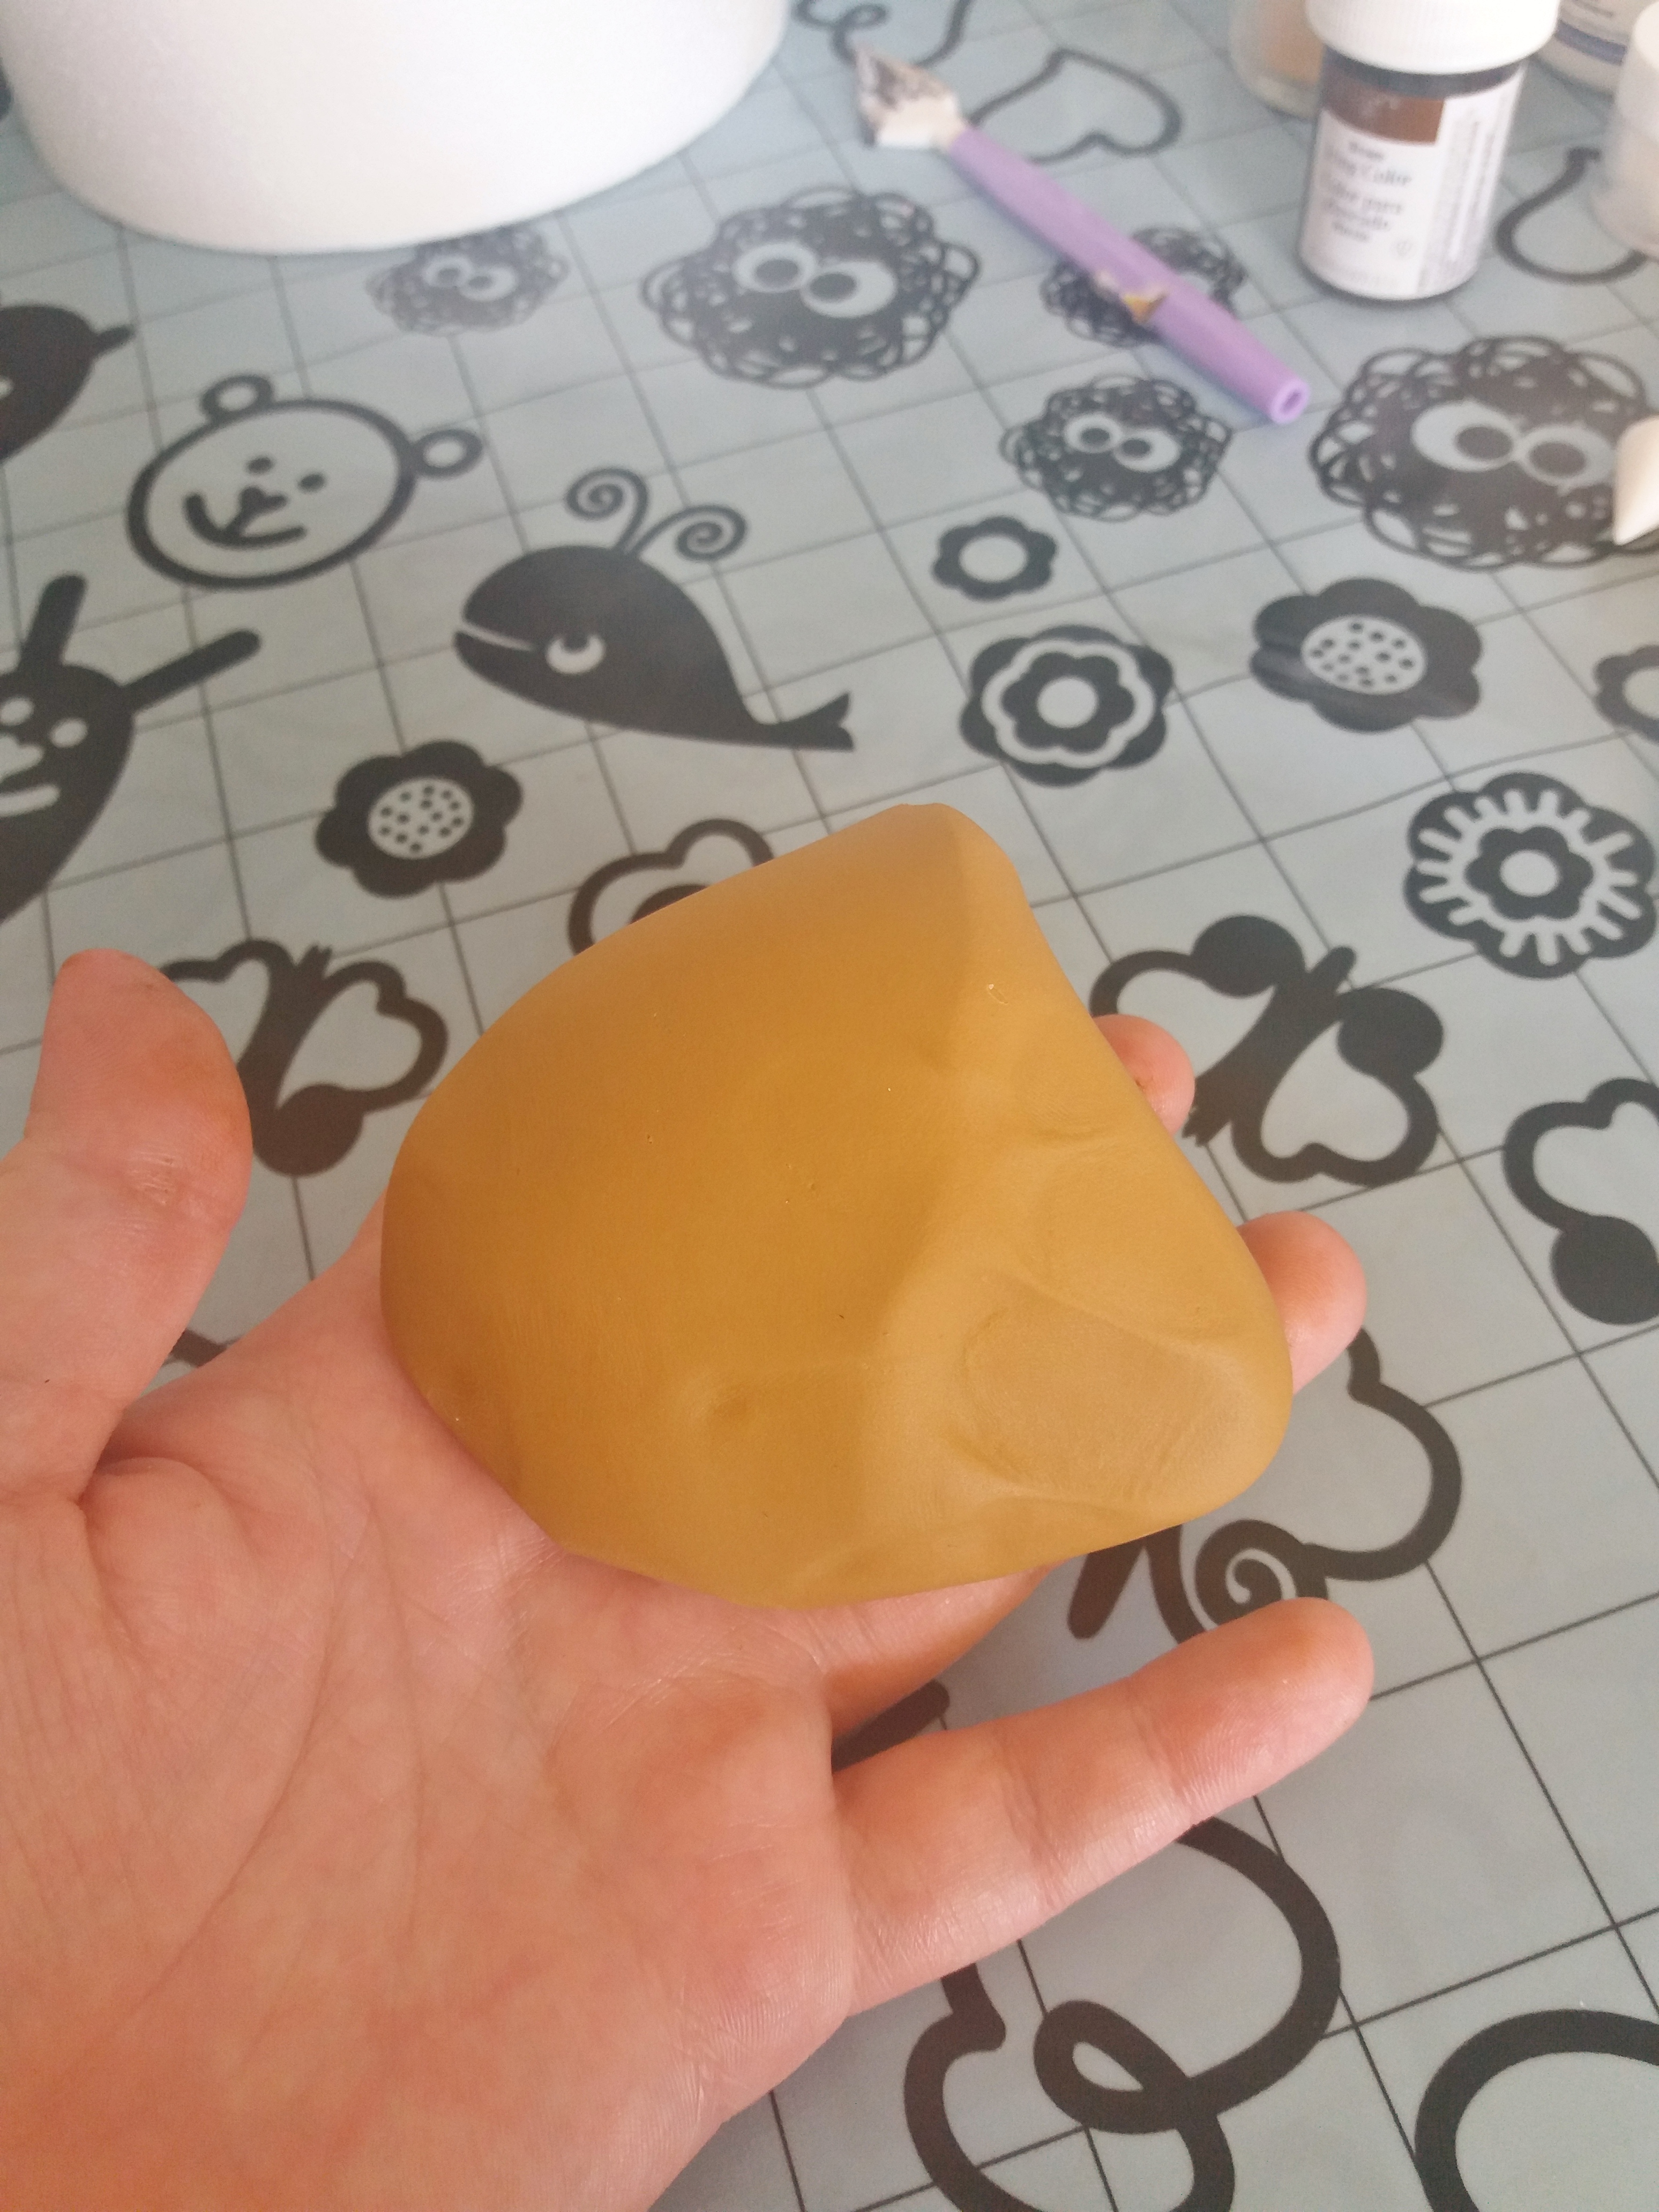


Then I took the darker brown fondant and rolled it into a ball to be her head. I compared the size to an LOL Surprise! doll my daughter had laying around. I used this doll as a size reference to get the proportions right.

I started out using a ball tool to create the eye sockets. LOL Surprise! dolls have extremely large eyes that are very low down in their faces. Don't leave too much cheek left over and don't skimp on the size of the eyes.

Then I pressed a ball of white to fit into the eye sockets and used a sharp tool to make the mouth opening. Queen Bee's mouth is always open in an O shape because she's a spitter. You can fill her head with water and squeeze it back out her mouth. Can you tell my daughter love's LOL Surprise! dolls?
Next, I compared various round piping tips to the size of the eye color and pupil of the doll and used the ones that were about the right size to cut out the color of the doll's eyes, brown, and the black pupils.

I cut out the size of the pupils with the smaller piping tip and added the pupils into it and glued them onto the whites of the eyes with edible glue. Quick tip: all LOL Surprise! dolls are constantly looking up. I think it adds to the innocence and cuteness factor, but you can always orient the pupils toward the top of the eye.

Next, I rolled out some thin snakes of black fondant and glued them along the top of the eyes.

I added a few tiny balls of black onto the sides of the eyes for more eyelashes as well as short snakes above the eye for eyebrows. Then I added a tiny dot of brown for the nose and tiny snakes around the mouth for lips. I also added a tiny ball of brown cut in half onto the sides of the head for ears.


I also made the hole at the top relatively large so the neck of the head would fit into it.

I also made some holes in the side that the arms will fit into.


I made stripes all around the dress and pressed the head onto it. Since the actual doll doesn't want to sit up, it doesn't look like it, but the model was only barely taller than her. Pretty true to life size.

Then I rolled some thicker snakes of brown fondant, squashed one end flatter to be hands, cut out the thumb, but instead of making the individual fingers, I found it better to just press in some lines to indicate where the fingers are. LOL Surprise! dolls don't actually usually have separate fingers.

I added the arms onto the body as well as short little stumps for legs.


Then I rolled out some yellow fondant fairly thick and cut one edge to be straight...ish. Queen bee has straight bangs, but then the hair comes down on both sides. That what I was trying to achieve.

I carefully laid the hair onto the head, adding a bit of height to the head. Then I added a couple of balls of yellow onto the back of the head to be her buns.

I used a blunt sculpting tool to create some bumpy texture in her hair. Then I painted it all over with edible glue.


I also wanted to make the LOL Surprise! logo for the side of the cake. I rolled out some pink fondant fairly thick. I wanted this to be the back.


Then I extruded a bit of black fondant and surrounded the LOL with it as well as the dots.

Then I added a few dots with tiny balls of squashed black fondant. In retrospect I probably should have painted these on.


So far, everything that we've done has been preparation. Finally, the day to make the cake arrived. There was still a couple important steps that had to be done before we are at cake, but we'll get there.
First off, I made the sugar sheet. Remember Sabrina specifically said that she wanted a purple sugar sheet with a bit of gold. So first, I had to color my sugar purple. I colored it with some purple and pink gel food coloring added to a bowl full of sugar. Just stir it with a spoon. There are a few flecks, but most of the color is mixed through.


While that's setting up, I made some meringue cookies. I wanted to make Swiss meringue buttercream anyway, so I started that process and stopped before adding the butter. I took some of the meringue and put them in two bowls, one colored purple, the other blue. Those are my daughter's favorite colors.

I put both meringues into piping bags with star tips and just started piping some rosettes and drops. Various sizes and I added some lollipop sticks to some of them. Then I placed them into a barely on oven for an hour and switched off the oven and allowed them to cool in the oven until they were set up.

Now we're at cake! This is funfetti cake (on request) and Swiss meringue buttercream. I had three layers of six-inch cake.

I crumb coated the cake in the buttercream.


Then I placed Queen Bee onto the cake.

I filled in the top with more pieces of sugar sheet.

The worst spots of sugar sheet I covered with the LOL Surprise! logo.

And pressed in some meringue pops behind the figure.


Watch us make this cake on YouTube here: https://youtu.be/FYJ2vZp1jgI
Schaut zu wie wir diese Torte auf YouTube machen hier: https://youtu.be/pLSj-bG7Bqg


Comments
Post a Comment